
Repairing poorly done crack repairs
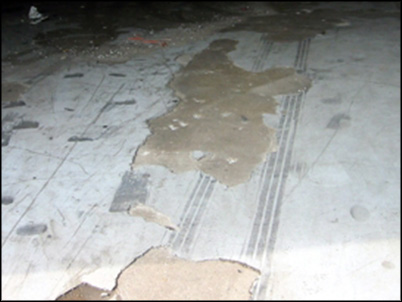
Topcoat repairs to floors are all too often so thin that they can’t hold up to point loads. These surfaces often crumble off and require the removal of the entire coated surface. Another danger is having liquids soften the layer of concrete between the two surfaces, breaking the bond. Thin set concrete coatings have limited adhesion. These thin coatings are subject to having pockets blister off the substrate which eventually crumble and become dust. Once hollow areas are removed, filling with 100% solid epoxy can level those floors and seal them from further damage.
Prep the surface with high alkaline, followed by an acidic cleaner and a couple scrub rinses. When the floor is dry, you can pour 100% solids epoxy over the area to be repaired. Then throw in small amounts of color quartz or silica sand and use a squeegee to move the liquid back and forth over the holes. By doing this, the heavier quartz will sink to the bottom of those holes, over time. You often have to squeegee a bit in one area and wait a few minutes to come back and add more filler and agitation to allow those holes to fill to the surface. If too liquid, the surface tension may allow the holes to appear concave or convex. This requires smoothing them with a grinder after they harden. If done well, this technique can bring the floor to level with a minimum of effort, producing a surface that is going to adhere well and take significant point loads without damage.
Here are the steps for repairing failed repairs:
- Use a mallet and scraper to find areas of substrate that are about to come loose and remove them.
- Clean the surface using a rotary scrubber with a high alkaline cleaner followed by a high acidic cleaner and scrub rinse.
- After drying, use a 4” grinder with a masonry wheel to bevel the edge of craters so edges are about 45 degrees towards the floor.
- Sweep off excess ground material.
- Use a glazing compound and putty knife to fill hairline cracks so the epoxy will not sink in and continue to show them.
- For larger cracks, fill sand into them using a broom until sand becomes visible which will keep your epoxy from sinking through the cracks. Make sure no sand remains on the surface.
- Mix up your two-part, 100% solids epoxy in one gallon batches so it stays as fluid as possible.
- Use a brush and 3/16″ lint-free roller to cut in around the edge of the room and around legs and other obstacles.
- Mix more epoxy just as you need it so you are not working with thicker, tackier material that is more than 15 minutes old.
- Dip your roller and apply to all flat areas.
- Pour epoxy directly into any cavities and holes.
- Use your roller or a soft squeegee pulling towards you and lifting as needed to achieve level surfaces over each hole or problem area.
- Allow the floor to harden about 15 hours and then use a 3M-type sanding screen on your rotary scrubber to remove high spots and problems.
- Sweep off dust and residue caused by the screening.
- Repeat steps 5 through 12 for a second coat if needed.
Following these steps will result in repairs which have a good chance of lasting. A heavy impact to the floor may still make layers of a cement-type patch let go, but more often than not, you will avoid additional problems. Your floor will be relatively flat and good looking while being easy to keep clean and maintain.
Durall Industrial Flooring supplies kits of materials that are customized to owner specification and delivered directly to the job site. Kits include full directions and 24/7 help lines staffed by seasoned flooring experts, so professionals and amateurs alike can successfully install a quality floor.
For a detailed quote of materials needed to apply epoxy paint to your floor, please visit our free cost analysis page at http://concrete-floor-coatings.com/costanalysis/
For more information, contact Chris Biesanz at chris@durallmfg.com or phone 1-800-466-8910 or 952-888-1488 (24/7).
Our Customers


Address: 9655 Newton Ave. South | Bloomington MN 55431
Phone: 952-888-1488